Moving a website to a new server can feel intimidating, but don’t worry — we’ve got you covered. In this guide, you’ll learn how to move a single cPanel account to a new server in a simple, step-by-step way — no stress, no confusion.
Moving just one cPanel account? Great — this is the simplest type of migration, and we’ll walk you through it step-by-step. You don’t need to rush. Grab a cup of coffee, open your terminal, and let’s begin!
Method 1: SSH-Based Manual Migration
- 1. Connect to the Source (Old) Server:
Use SSH from your computer or terminal to access your old server:
ssh your_username@old_server_ip
Hint: Replace your_username with your actual SSH user, and old_server_ip with the IP address of your current server.
- 2. Create a Full Backup of the cPanel Account:
Navigate to the home directory first:
cd /home
Now, generate the backup:
/scripts/pkgacct cpanel_username
Hint: Replace cpanel_username with the username of the account you want to move.
Note: This process may take a few minutes depending on the account size. Just wait for it to finish before proceeding.
- 3. Transfer the Backup to the New Server:
Run this command to transfer the backup file:
rsync -av --progress /home/cpmove-cpanel_username.tar.gz root@new_server_ip:/home
Hint: Replace cpanel_username and new_server_ip with the account username and your new server’s IP address.
Note: This step may take several minutes, depending on the file size and connection speed.
- 4. Restore the Backup on the Destination (New) Server:
Now SSH into the new server:
ssh your_username@new_server_ip
Navigate to the home directory first:
cd /home
Then restore the account backup:
/scripts/restorepkg cpmove-cpanel_username.tar.gz
Note: After this, log in to WHM or cPanel to verify that everything is working correctly.
Method 2: Use the cPanel Backup Feature (No SSH on Source Server)
- 1. Log in to the Source cPanel Account:
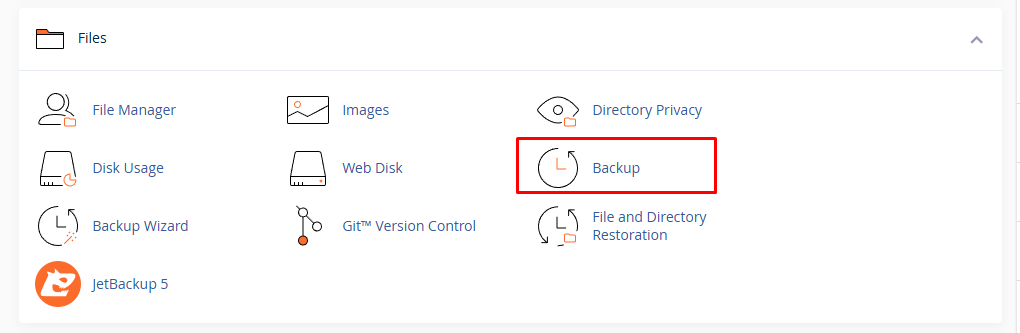
Access the cPanel account you want to migrate. Scroll down to the Files section and click on Backup.
- 2. Create a Full Account Backup:
In the Backup interface, look for the Full Backup option. Click on Download a Full Account Backup.

For the backup destination, select Home Directory and click Generate Backup.
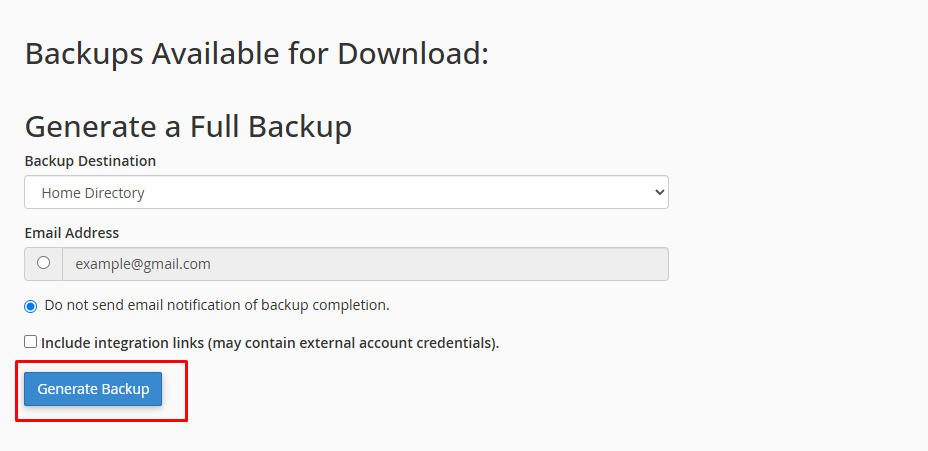
Hint: You can enter your email address to receive a notification when the backup is complete.
Note: The backup file may take a few minutes to generate depending on the size of the account.
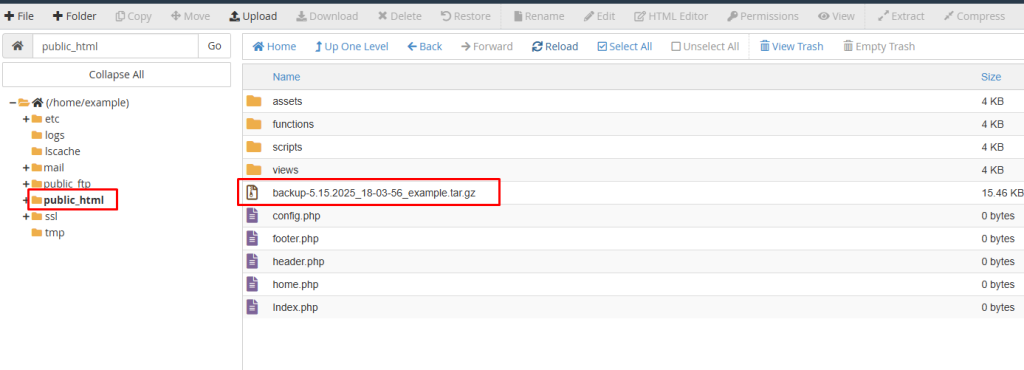
- 3. Locate the Backup File:
Once the backup is complete, go to the File Manager in cPanel and navigate to the main directory (click Up One Level if needed).

You should see a file that looks something like this: backup-5.11.2025_13-51-24_username.tar.gz
- 4. Move the Backup File into the public_html Folder:
Right-click the backup file and choose Move. Enter /public_html as the destination and click Move File.
Hint: This step makes the file accessible from your browser using your domain name.
- 5. Set File Permission to 777:
Still in File Manager, right-click on the backup file inside the public_html folder and click Change Permissions.
Set all permission checkboxes to make it 777 and save the changes.
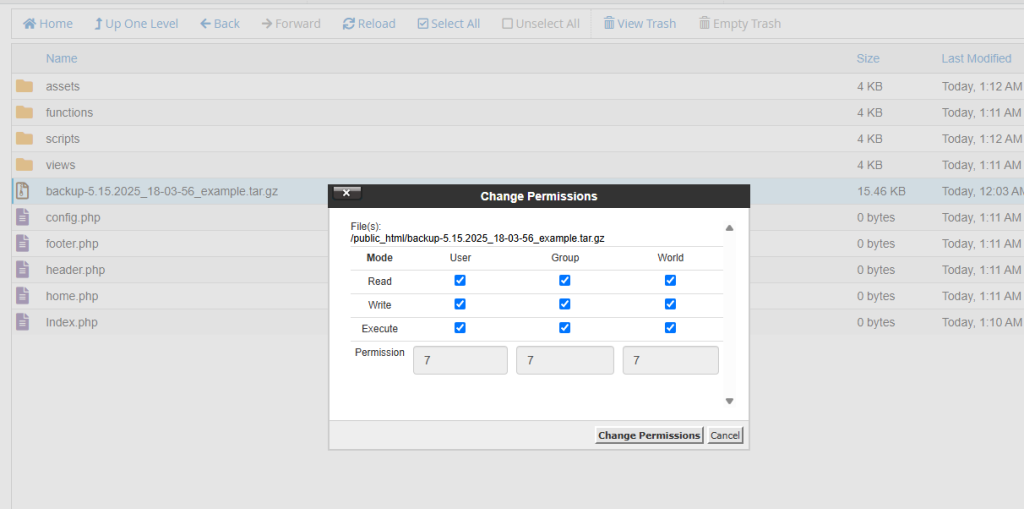
⚠️ Warning: Setting 777 permissions allows full public access to the file. Make sure to delete the file immediately after restoration to avoid security risks.
- 6. Verify the Download Link:
If your domain is example.com and your backup file is named backup-5.11.2025_13-51-24_username.tar.gz, then the file will be accessible at:
https://example.com/backup-5.11.2025_13-51-24_username.tar.gz
Hint: Open this link in a browser to confirm it is working and the file is downloadable. Only proceed when the file link is live.
- 7. Restore the Backup on the Destination Server:
SSH into your new (destination) server using your terminal:
ssh your_username@new_server_ip
Navigate to the home directory:
cd /home
Now download the backup file directly from the old server’s public link using wget:
wget https://example.com/backup-5.11.2025_13-51-24_username.tar.gz
Hint : Replace example.com with your actual domain name and backup-5.11.2025_13-51-24_username.tar.gz with your real backup file name.
Note: Wait until the download reaches 100% before moving to the next step.
Once the download is finished, restore the backup using this command:
/scripts/restorepkg backup-5.11.2025_13-51-24_username.tar.gz
Hint : Replace backup-5.11.2025_13-51-24_username.tar.gz with your real backup file name.
Final Step: Log in to WHM or cPanel on the new server to verify that the account is working properly.
Hint 2: Replace example.com with your actual domain name and backup-5.11.2025_13-51-24_username.tar.gz with your real backup file name.
And that’s it! You’ve now learned two reliable ways to move a single cPanel account to a new server — one using SSH for full control, and another through cPanel’s own backup tool, ideal when SSH access isn’t available on the source server.
✅ Don’t forget to delete the backup file from the public_html folder after restoring it to keep your server safe. Great work — migration complete!
